
Objective
Start getting acquainted with the use of IaaS and PaaS cloud services for building and deploying applications on the cloud.
The hands-on exercise will be inspired by https://docs.microsoft.com/en-us/azure/app-service/quickstart-python?tabs=bash&pivots=python-framework-flask, but we will add Google Collab to externalise the whole task.
The general aim is to deploy a Python web app to App Service on Linux, Azure’s highly scalable, self-patching web hosting service (PaaS service).
Let us make a big step into externalisation!
Material
- A google account for using Google Collab
- ngrok account https://ngrok.com to expose a web server to the internet. Do not install anything in your local machine.
- Student free trial access to Microsoft Azure
- Code https://github.com/Azure-Samples/python-docs-hello-world
ToDo
Building your App
1. Connect to Github to retrive the hands-on:
https://gist.github.com/javieraespinosa/8d9e93cff61c675d74bd862975a84d5e
2. Set up your initial environment
- Install Azure CLI

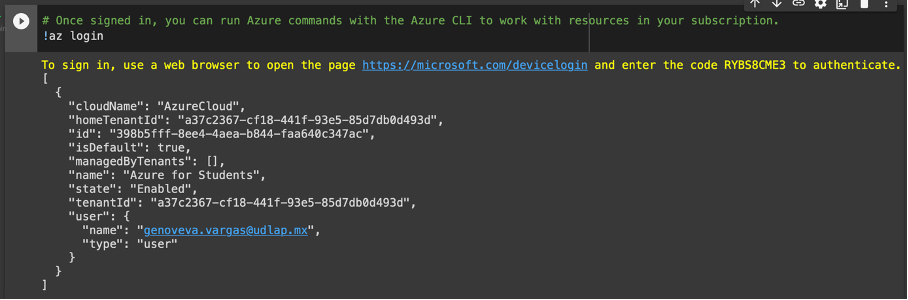
– Instead of having Azures CLI in our local machines. It is running in some server provided by Google. Let us check the version of the CLI that we have installed there.

- See the resources that Google has assigned us to run our code
- Configure Azure CLI
- Install ngrok and validate your account (!)

- Config ngrok with your own authtoken (see https://ngrok.com). Go to your ngrok account and copy your token:
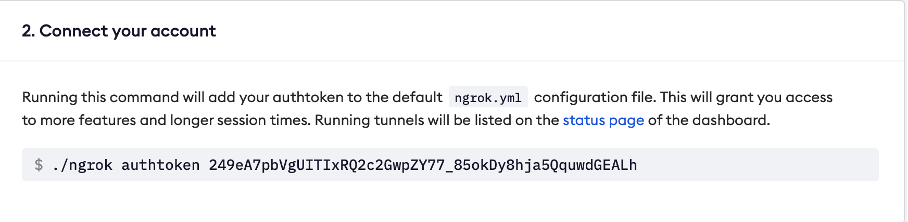
- Copy your token on the notebook. The first line is a Python assignment to a variable. The second is a bang operator that executes a command that configures the application ngrok. ngrok allows you to expose a web server running on your local machine to the internet. Which is our local machine in our externalized setting?

3. Clone the sample
The sample contains framework-specific code that Azure App Service recognises when starting the app. It lies in the GitHub repository provided by the Azure tutorial https://github.com/Azure-Samples/python-docs-hello-world
- Clone the sample provided by the Azure tutorial

- Install python dependencies. The first instruction is a Python line that executes an OS command where % ensures that the result is considered “persistent” in the Collab server we are using. In that location we are going to install what is specified in the file requirements.txt, in this case it makes sure that it has the flask[1] libraries. Open the file to have a look.
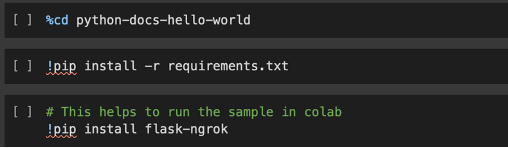
The bang operator uses the command pip[2] to install.
4. Run the sample
- See the Sample file (app.py) content
- Load and execute sample in Collab.
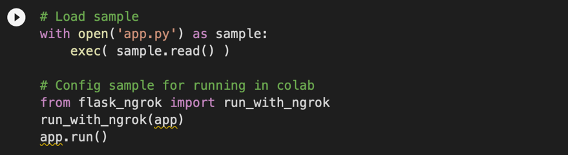
- Follow the ngrok URL to see the output
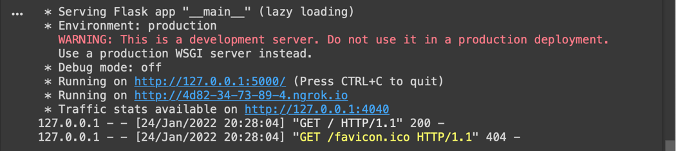
- The app displays the message Hello, World!.
5. Deploy the sample
Deploy the code in your local folder (python-docs-hello-world) using the az web app up command. The command may take a few minutes to complete. While running, it provides messages about creating the resource group, the App Service plan and hosting app, configuring logging, then performing ZIP deployment. It then gives the message, “You can launch the app at http://<app-name>.azurewebsites.net”, which is the app’s URL on Azure.
- Define a unique APP_NAME. This will be part of your app URL (e.g. http://APP_NAME.azurewebsites.net)

- Deploy the sample

6. Browse the app
Browse the deployed application in your web browser at the URL http://<app-name>.azurewebsites.net. It can take a minute or two for the app to start, so if you see a default app page, wait a minute and refresh the browser.
The Python sample code runs a Linux container in App Service using a built-in image.
Congratulations! You’ve deployed your Python app to App Service.
Managing your app
1. Redeploy Updates
This section makes a small code change and then redeploy the code to Azure. The code change includes a print statement to generate logging output (see below).
- Open app.py in an editor and update the hello function.
- Save your changes, then redeploy the app using the az webapp up command again:

- This command uses values that are cached locally in the .azure/config file, including the app name, resource group, and App Service plan.
- Once deployment is complete, switch back to the browser window open to
http://<app-name>.azurewebsites.net. Refresh the page, which should display the modified message.
2. Stream Logs
You can access the console logs generated from inside the app and the container in which it runs. Logs include any output generated using print statements.
- Run the az webapp log tail command

- You can also include the –logs parameter with then az webapp up command to automatically open the log stream on deployment.
- Refresh the app in the browser to generate console logs, which include messages describing HTTP requests to the app. If no output appears immediately, try again in 30 seconds.
- To stop log streaming at any time, press Ctrl+C in the terminal.
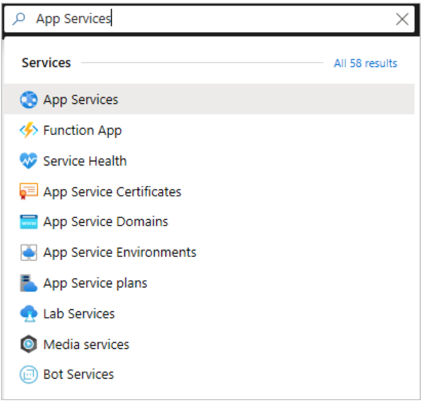
3. Manage your Azure App
Go to the Azure portal to manage the app you created. Search for and select App Services.
- Select the name of your Azure app.
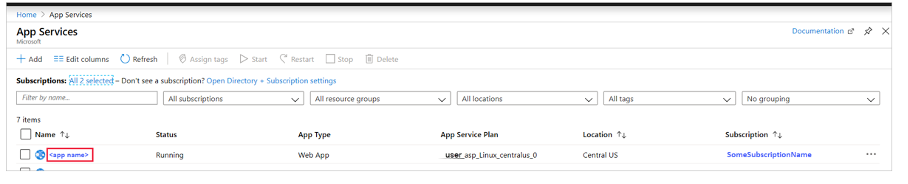
- Selecting the app opens its Overview page, where you can perform basic management tasks like browse, stop, start, restart, and delete.
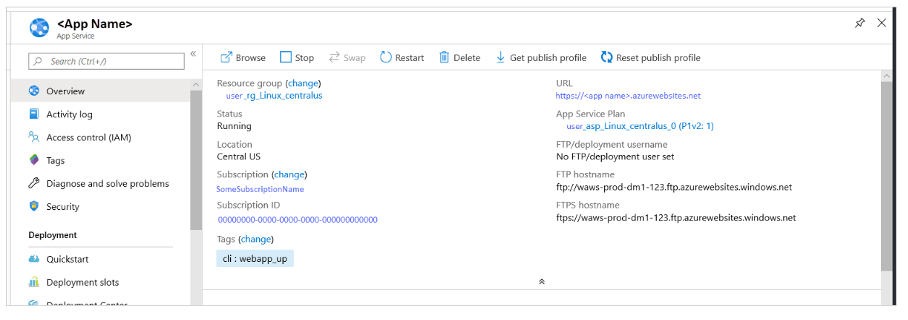
- The App Service menu provides different pages for configuring your app.
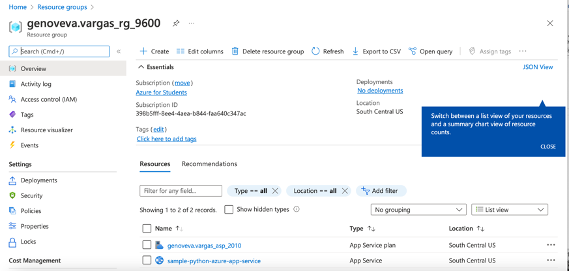
4. Clean up resources
In the preceding steps, you created Azure resources in a resource group. The resource group has a name like “appsvc_rg_Linux_CentralUS”, depending on your location. If you keep the web app running, you will incur ongoing costs (see App Service pricing).
If you do not expect to need these resources in the future, delete the resource group by running the following command:

The command uses the resource group name cached in the .azure/config file. Have a look at your portal again.
To Hand-In
Once you have completed the hands-on, prepare a document with the following content. Name your document as lis-4112-<your ID>-ho-1.pdf upload it here:
https://drive.google.com/drive/folders/16K5-Zk0N0yIukhTK_eAFSZgR2M1iLttG?usp=sharing
- Draw a functional architecture showing how the different cloud services interact for building your App.
- You can choose to draw several architectures for the different steps that you performed.
- Exhibit in your figures the cloud provider and tag the services according to their type (IaaS, PaaS, SaaS).
- Draw the process that summarizes the main steps and substeps of the exercise. The figure must be synthetic but also explicitly labelled insisting on the I/O of the different steps. Do not forget to explain:
- the authentication process (with ngrok);
- the management of the “download” process of the sample files.
- Compare the tutorial process proposed by the Azure Tutorial (https://docs.microsoft.com/en-us/azure/app-service/quickstart-python?tabs=bash&pivots=python-framework-flask) and the one implemented in the lab under a complete externalized setting.
Create a glossary in a document including the explanation of ngrok, flask, CLI, notebook, magic, C
[1] https://flask.palletsprojects.com/en/2.0.x/ Flask is a micro web framework written in Python. It is classified as a microframework because it does not require tools or libraries. A web framework (WF) or web application framework (WAF) supports the development of web applications. A WF provides a standard way to build and deploy applications on the Web to automate the overhead associated with typical activities performed in web development (see https://en.wikipedia.org/wiki/Flask_(web_framework)).
[2] Pip is a recursive acronym that can stand for either “Pip Installs Packages” or “Pip Installs Python”. Alternatively, pip stands for “preferred installer program“